Phase Resistance & the 4-Wire Method
Measuring Milliohms Without Lying to Yourself
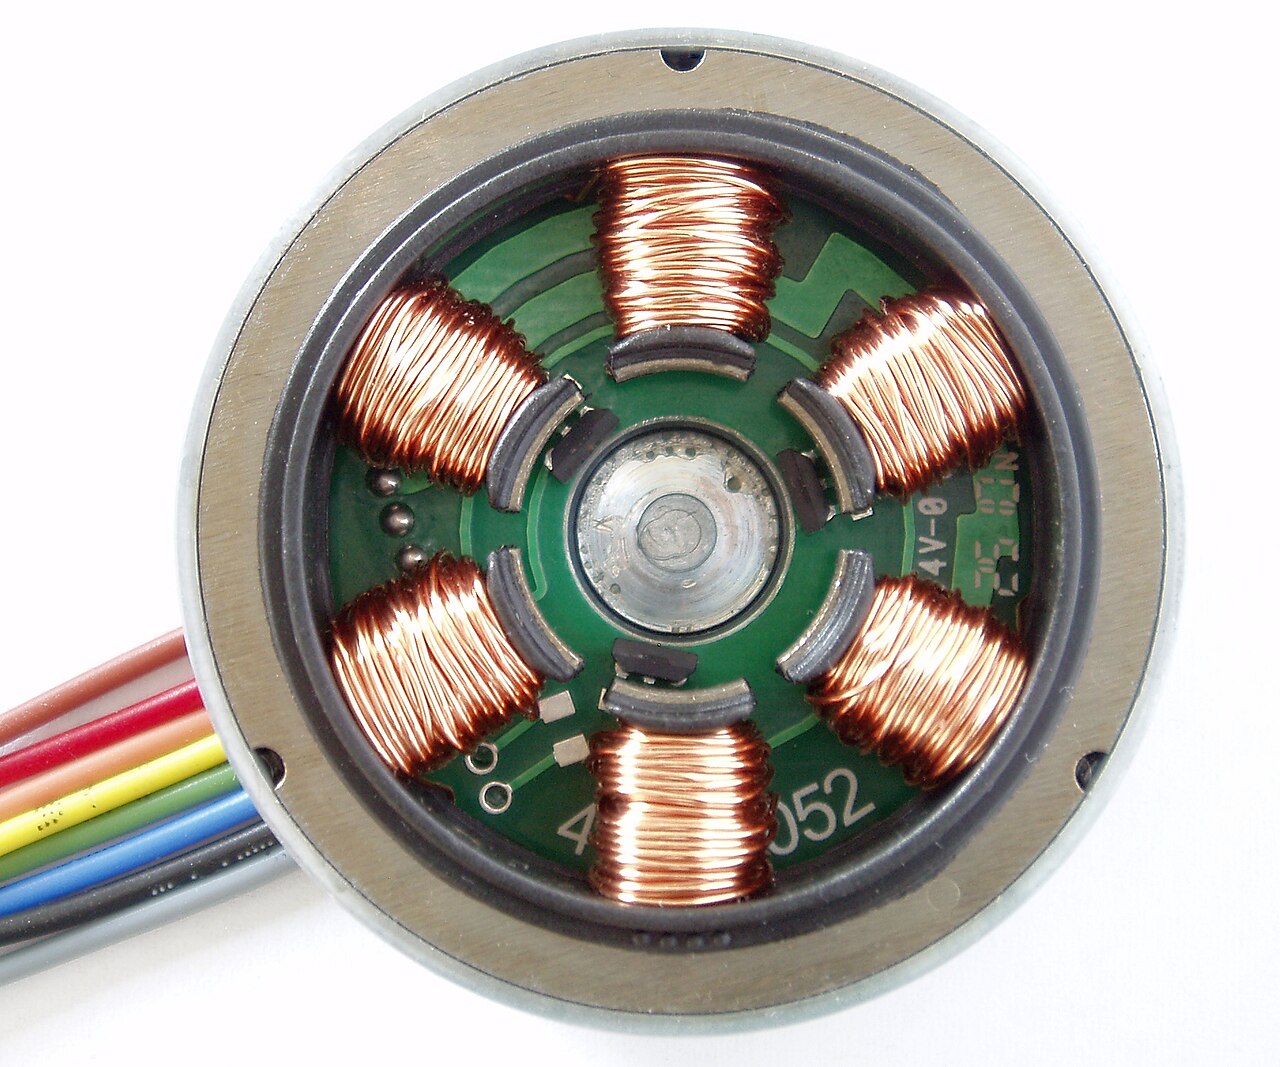
You clip a multimeter across one phase of a brushless motor that drives a robot finger, expecting a number small enough to plan your current loop around. The meter says 0.4 ohms. You move the probes a little, press harder, and now it says 0.3. You touch the leads together with nothing between them and it still reads 0.2. The motor winding is buried somewhere inside that reading, drowned out by the resistance of your own wires and the tiny pressure of two probe tips on metal.
When the thing you want to measure is smaller than the ruler you are measuring it with, the ruler is the answer you get.
A motor phase resistance is a sub-ohm quantity, often a fraction of an ohm, and the leads and contacts of an ordinary meter add tens to hundreds of milliohms of their own. The fix is not a better meter so much as a better connection: split the job of pushing current from the job of sensing voltage, and put the sense contacts right at the winding where no error can sneak in. Everything in this lesson rests on that one ordering idea: force current through one pair of wires, sense voltage through a separate pair.
By the end, you can
- Explain why a 2-wire DMM cannot trust a sub-ohm reading, in terms of lead and contact resistance
- Describe how 4-wire (Kelvin) sensing separates force and sense paths so lead resistance drops out
- Calculate a phase resistance from a forced current and a sensed voltage with $R = V/I$
- Choose a measurement current low and brief enough to avoid self-heating that shifts the result
Intuition first
Picture weighing a single grain of rice on a kitchen scale, but you have to leave the rice in its plastic bag and your hand stays resting on the platform the whole time. The scale reads a few hundred grams. Somewhere in that number is the grain you care about, but you will never see it: the bag and your hand swamp it completely. The honest move is to find a way to subtract everything that is not the rice.
A 2-wire resistance measurement has the same disease. The meter pushes a tiny known current out one lead and back the other, and reads the voltage across its own terminals. But that voltage includes the drop across both test leads and both probe-to-metal contacts, not just the winding. For a 1 kilohm resistor that extra fraction of an ohm is noise you can ignore. For a 0.2 ohm motor phase it is most of the reading.
The trick that saves you is almost embarrassingly direct. Use four wires instead of two. One pair, the force leads, carries a known current into and out of the winding. The other pair, the sense leads, touches the winding right at its terminals and runs to a high-impedance voltmeter that draws essentially no current. Because no meaningful current flows in the sense wires, Ohm’s law says they develop essentially no voltage drop of their own, so their resistance simply does not appear in the answer. You measure the voltage exactly where you want it, and the wires that get you there charge you nothing.
Why two wires lie about milliohms
Write it as a circuit and the problem becomes a single inequality. In a 2-wire measurement, the meter sees the winding in series with the resistance of both leads and both contacts, call the total parasitic series resistance . The meter forces a current and divides the terminal voltage by it:
The fractional error is just the ratio of what you do not want to what you do:
Put real numbers in. A modest pair of leads plus probe contacts might add . A small robot-finger BLDC phase might be . Then
a 50 percent error. You did not measure the motor. You measured the motor plus half a motor’s worth of wire. And the wire half is not even stable: press the probes harder and the contact resistance drops, breathe on the cold leads and the copper resistance creeps up. The reading wanders because the part you cannot control is doing the talking.
Force and sense: the 4-wire connection
Four-wire sensing, also called four-terminal or Kelvin sensing, breaks the single two-job connection into two single-job connections.
        force (carries current I)
   o------/\/\/\------ R_lead -----+
   |                               |
   |   sense (carries ~0 current)  |
   |   o---------------------------+---+
   |   |                           |   |   <- winding terminal
   |   |                         [ R_x ]      (the phase you want)
   |   |                           |   |   <- other terminal
   |   o---------------------------+---+
   |                               |
   o------/\/\/\------ R_lead -----+
        force (carries current I)
The outer pair are the force leads. They carry the full measurement current and so they develop a voltage drop across their own resistance, but you never look at that drop. The inner pair are the sense leads. They tap the voltage right at the winding terminals and run to a voltmeter with very high input impedance, so the current down the sense wires is vanishingly small. With near-zero current, Ohm’s law gives near-zero drop in the sense leads no matter what they are made of:
So the voltmeter reads the genuine drop across alone, and the phase resistance is simply
The force-lead resistance and the contact resistance still exist, but they sit in the force path, where you only care that current got delivered, not how much voltage it cost to deliver it. The sense path, where you read, carries no current, so its imperfections never turn into volts. This is exactly what a milliohm meter, an LCR meter in 4-wire mode, or a careful bench supply plus separate voltmeter all do under the hood.

A current low enough to tell the truth
There is a second trap, and it is sneakier than the leads. The resistance you are chasing is not a fixed property of the copper. Copper resistance rises with temperature, by roughly four-tenths of a percent per degree Celsius. If your measurement current is large enough to warm the winding, the very act of measuring changes the number, and you watch the reading drift upward second by second as the copper heats. You end up reporting a hot resistance for a motor you thought was cold.
So the rule for the force current is: low and brief. Low, so the self-heating power stays negligible. Brief, so that whatever tiny heat you do inject has no time to accumulate. A milliohm meter manages this for you by using a modest sense current and reading quickly. If you roll your own with a bench supply, pick a current that produces a comfortably readable sense voltage (tens of millivolts is plenty for a good meter) without dumping watts into a small winding, and take the reading promptly rather than letting current sit.
Concretely, forcing through a phase dissipates in a part that might mass only a few grams. Hold that for a while and the winding warms and the reading climbs. Forcing instead dissipates only , a hundred times less heat, while still developing , which a decent voltmeter resolves easily. Same physics, no self-cooking.
You measure a BLDC phase with a 2-wire DMM and read 0.30 ohms. You know your leads plus probe contacts add about 0.10 ohms. What is the true phase resistance, and what does this say about 2-wire on sub-ohm parts?
-
A 2-wire DMM does not know or subtract its own lead and contact resistance; it reports R_x + R_lead as a single number.
-
Correct. The meter read R_x + R_lead = 0.30, and R_lead is about 0.10, so R_x is near 0.20 ohms. The leads are a third of the reading, which is exactly why 2-wire cannot be trusted for sub-ohm parts.
-
The lead resistance is in series and is already part of the 0.30 reading; you subtract it, you do not add it.
-
It is very measurable with 4-wire sensing, which removes the lead and contact resistance from the result.
In a 4-wire (Kelvin) measurement, why does the resistance of the sense leads NOT appear in the answer?
-
Ordinary copper sense leads work fine; the trick is electrical, not metallurgical.
-
Correct. With a high-impedance voltmeter the sense current is near zero, so by V = I times R the sense leads drop near-zero volts regardless of their resistance. You read the winding drop alone.
-
Length helps for the force leads' gauge, but sense-lead length is irrelevant precisely because they carry no current.
-
There is no stored subtraction; the cancellation is physical, from zero current in the sense path, not a calibration table.
Lab: a Kelvin phase reading on the bench
Pick one motor phase. If you have a milliohm meter or an LCR meter with a 4-wire fixture, use it directly and let it set the current. If you only have a bench supply and a DMM, build the Kelvin connection by hand: run two stout force wires from a current-limited supply to the two phase terminals, set the supply to current-limit at a low value (start around 0.1 A for a small motor), and clip two separate thin sense wires onto the same terminals, as close to the winding as the connector allows, running to the DMM on its millivolt range. Read the sense voltage and the supply current, compute , and write down the winding temperature you measured it at. Now do the same phase 2-wire and compare. The gap between the two numbers is the lead-and-contact error you just learned to delete. Take the 4-wire reading quickly so the copper has no time to warm.
Kelvin's 1861 bridge, remote sensing, and the 3-wire compromise
The method is named for William Thomson, Lord Kelvin, who built the Kelvin bridge in 1861 specifically to measure very low resistances by keeping the current-carrying and voltage-sensing paths separate. The same principle reappears all over precision electronics. A low-value current-sense shunt almost always breaks its terminals out as four connections, two heavy ones for the load current and two light ones for the sense amplifier, so the shunt’s own contact resistance never corrupts the current reading. In a power supply, the identical idea is called remote sensing: the supply runs extra sense wires to the load and regulates the voltage measured there, cancelling the drop in the heavy supply cables.
There is a cheaper cousin worth knowing. Three-wire sensing uses one common return plus separate load and sense leads at the far end, and assumes the common wire drops the same voltage as a matched load wire of equal gauge and length, so it can subtract one to estimate the other. It is not as accurate as true 4-wire, but it cancels most cable resistance and is good enough for resistance thermometers (RTDs), where the sensor sits at the end of a long lead and you mostly need to remove the cable, not chase the last fraction of a percent.
For the motor, the four-wire number you measure is the per-phase DC resistance. Note one subtlety the course returns to next lesson: what you read depends on the winding topology. Probing two terminals of a wye-connected motor puts two phase windings in series, while a delta winding presents one phase in parallel with the other two in series. The raw Kelvin reading is honest about the copper between the two terminals you clipped; turning that into a single per-phase value, and correcting it back to a reference temperature, is exactly the job of #38.
Grounded in Wikipedia: “Four-terminal sensing”, “Motor constants”, “Brushless DC electric motor” (CC BY-SA).
Key takeaways
- A motor phase is sub-ohm; a 2-wire meter's own leads and contacts (tens to hundreds of milliohms) can be most of the reading.
- 4-wire (Kelvin) sensing forces current through one pair of leads and senses voltage through a separate pair right at the winding.
- The sense leads carry almost no current, so by $V=IR$ they drop almost no voltage and their resistance falls out: $R_x = V_{\text{sense}} / I_{\text{force}}$.
- Keep force and sense pairs correctly ordered (sense inside, force outside); swapping them lets force-lead drop leak back into the answer.
- Use a low, brief current so $I^2R$ self-heating does not warm the copper and inflate the very resistance you are measuring.
Using a 4-wire setup you force 0.10 A through one motor phase and the sense voltmeter reads 18 mV. What is the phase resistance?
Show worked solution
Apply directly, since the sense path removed the lead and contact resistance:
So the phase is about (180 milliohms). Because this is a Kelvin reading, that figure is the winding alone, not winding-plus-wires.
A colleague measures the same phase 2-wire and gets 0.27 ohms; your 4-wire measurement gives 0.18 ohms. How much resistance did the leads and contacts add, and what fraction of the 2-wire reading was error?
Show worked solution
The 2-wire meter reports , so the parasitic part is the difference:
As a fraction of what the 2-wire meter displayed:
so about a third of the 2-wire reading was leads and contacts, not motor. That is the error 4-wire sensing deletes, and it is why you never plan a current loop around a 2-wire sub-ohm number.
You want a sense voltage of at least 20 mV across a 0.15 ohm phase for a clean reading, but you must keep self-heating below 5 mW so the copper does not warm during the measurement. Find the force current that meets the voltage floor, then check whether it stays under the power ceiling. If both cannot be met at once, say what you would change.
Show worked solution
First, the current needed to reach 20 mV across :
Now the heat that current would dissipate in the phase:
That is below the 5 mW ceiling, so both constraints are satisfied: force about , read roughly , and dissipate under (no meaningful heating). If the ceiling had been tighter, say 1 mW, the same current would have failed it (), and you would switch to a more sensitive voltmeter so a smaller current still gives a readable sense voltage, or take the reading in a quick pulse so the brief heat never accumulates. The lever is always to lower and recover resolution elsewhere, never to let the copper warm.
The honest measurement is the one that refuses to count its own wires. Split the pushing from the listening, put your ear right against the winding where no current flows, and ask only a whisper of current so the copper never heats up enough to change its story. Do that, and the milliohms stop hiding behind your probes and finally tell you the truth.